
Avaruustaistelupeli
Making graphics for ATP #4: Putting things together in Unity
Previously in "Making graphics for ATP": we have created and exported LOD models in Blender and textured them in Substance. After the texturing process, we exported three by four sets of images that we are now going to combine with the meshes in Unity.
Importing to Unity
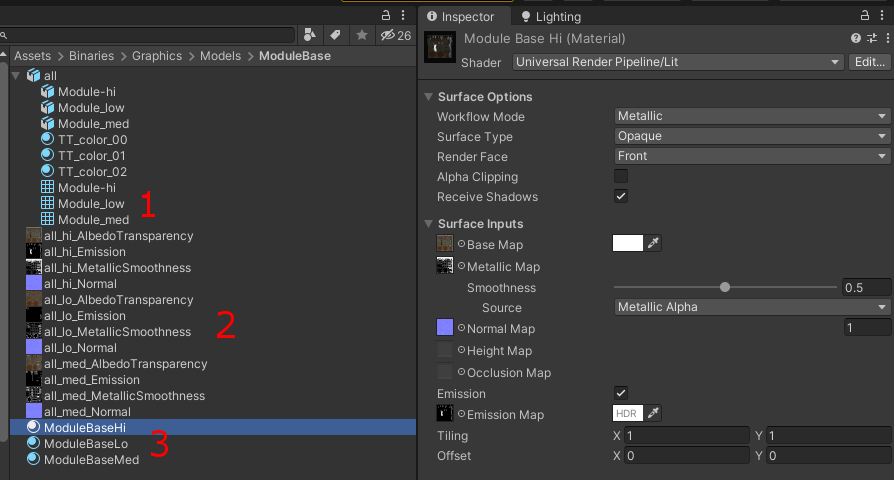
First we have to copy "all.fbx" (1) and all the twelve exported images (2) somewhere inside the Unity-project’s Assets-folder. Note that I will be only using the mesh data from the FBX-file (bottom three items). Three materials need to be created also, one for each LOD model (3). Textures are then assigned to the proper LOD materials: "...AlbedoTransparency" to “Base Map”, "...MetallicSmoothness" to "Metallic Map", "...Normal" to "Normal Map" (texture type needs to be changed to normal map, which Unity practically forces you to do) and "...Emission" to "Emission Map" (remember to enable the "Emission"-checkbox). A common mistake I tend to do, is to drag textures into wrong materials (lo-poly texture to hi-poly material etc.) Be sure to check this if the results look weird.
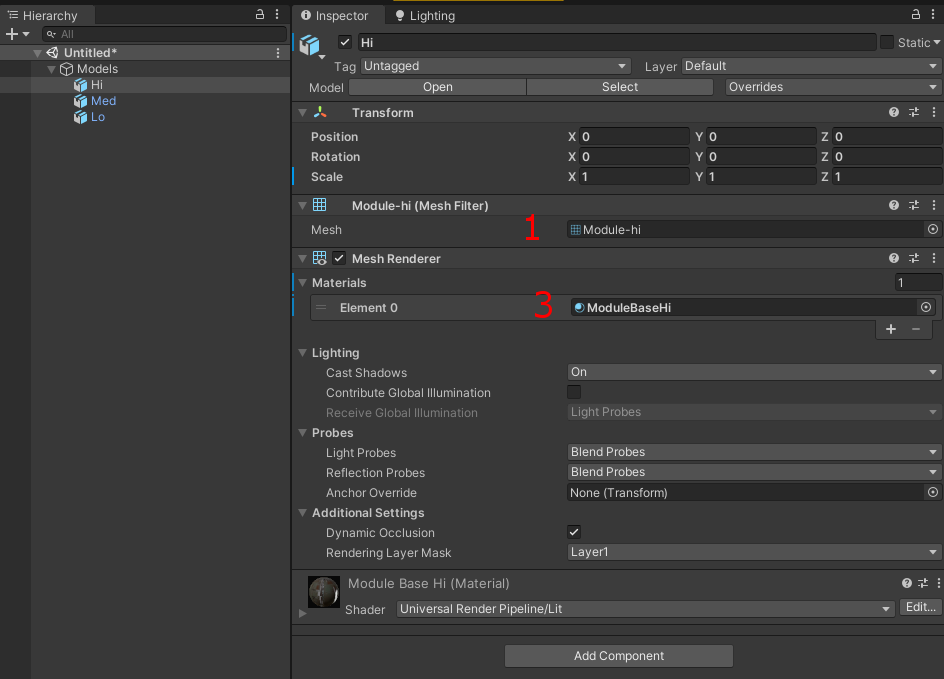
I continued by creating an empty game object "Models" with three child objects "Hi", "Med" and "Lo", again one for each LOD model. LOD objects should have zero position/rotation and unit scale (we'll cover these later). Then I dragged meshes (N.B.: the lines with grid-icon) from the FBX file onto their associated objects. Unity automatically creates a mesh filter, mesh renderer and mesh collider for each object. Since the game uses 2D-physics, the mesh colliders can be removed. And for the last, materials need to be dragged to mesh renderers' "Materials"-slot (there are no submeshes, so one material per object is enough).
The image below shows the high-poly object. Others work similarly. See how the "Mesh" (1) and "Materials" (3) values refer to the similarly numbered data elements in the image above.
Setting up the imported data
Next thing is to set up the "Models" -object. It is responsible for two things: transforming its children to the correct space, and choosing which LOD model to show in which situation.
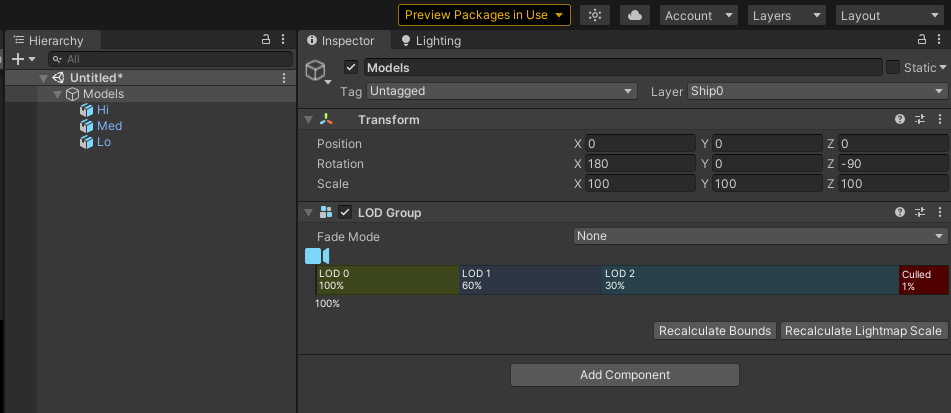
Axis and scale units differ in Blender and Unity, and as I'm only using the mesh data, the model is scaled and oriented wrong by default. The Blender-to-Unity-transform is best done in the "Models"-object, so the transform applies to all its children. In this case, I scale the models by 100 and rotate them to align with the world axis as seen in the screenshot below.
Blender-to-Unity transform could also be done while exporting/importing the models, but I myself got tired fighting with "Scale", "Forward" and "Up" values in Blender's export dialog. I found it easier to make rotations in Unity, where you can immediately see the results. At some point, you'll probably find yourself tweaking the values anyway and unless you have to deal with animations, doing transforms this way is really not an issue once you get the values right once. It also encourages keeping the models/graphics and functionality separated, which is usually a good habit.
All game objects are active by default, although only one LOD model should be visible at a time. To fix this, there is a built-in LOD Group-component that exclusively enables one of its children depending on the object size. So the high-poly model is shown in closeups, while the low-poly model is used from a distance. "Hi"-object is dragged to "LOD 0", "Med" to "LOD 1" and "Lo" to "LOD 2". Percentages differ depending on the model; to find good ones, you just have to experiment. Remember that Unity's built-in quality settings may affect the percentages.
Utilizing the LOD models is crucial to the performance, but there is a downside: transition from model to another may be abrupt and clearly seen. LOD Group has a "Fade Mode" -value for smoother, cross-faded transition, but unfortunately standard URP shaders don't support it. There are dithering-based shader solutions available (for instance here), but I haven't tried any of them yet. Hiding the LOD changes is hard, and visible transitions are easily found in virtually every indie game once you start looking. I'm not going to spend time on this yet, since it doesn't affect the gameplay.
Common functionality and a prefab
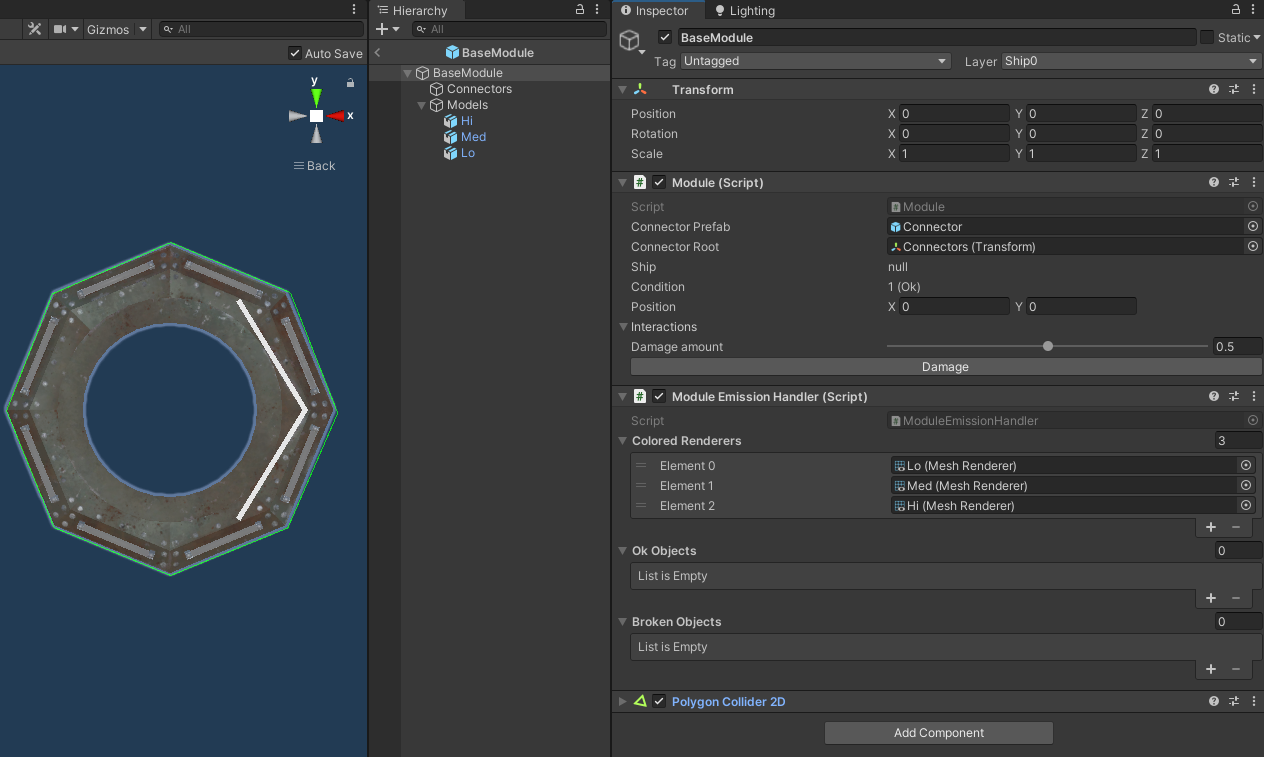
Once the models are imported and set up, we have to create yet one more object called "BaseModule", the root object of the module. It parents "Models"-object and contains all the stuff that is common to all module types (damage and condition state, connectors, reference to ship etc.) Connectors will be covered in the next chapter.
The object has two custom scripts attached: "Module" handles the common states and functionalities, and "Module Emission Handler" controls the lights. Please ignore module emission handler's "Ok Objects" and "Broken Objects" lists: they won't be used in the first iteration of graphics (if ever).
For the 2D-physics, I added a "Polygon collider 2D" and configured it to match the module's top-down profile (see the green line around the model). Note that only one collider is used, and it should encapsulate every LOD model. In order to look consistent, all LOD models' shapes should be close to identical (I should have mentioned this in chapter two). Transform of the "BaseModule" must be kept intact, since colliders may work unpredictably if their game object is scaled. The object will have further uses later on, and in order to be easily reused, I created a prefab by dragging "BaseModule" into the "Project"-window.
Emission
The models are now properly scaled/rotated and ready to be instantiated, but we still need to make the lights work by changing the material's emission-property.
In the previous version of ATP there were no LOD models, so only one emissive material was to be taken care of. Now there are three, so code has to iterate through a list of materials (see the "Colored renderers"-list in a screenshot above). This is luckily a small change, but still a reminder of little surprises one has to prepare for.
As the emission map only contains grayscale values (where red, green and blue components share the same value), they can easily be turned into any color by just multiplying. The multiplying color can be changed by setting “_EmissionColor”-value in Unity’s standard shaders. As it is an HDR -color, its intensity can exceed 1 for bloom effects and such.
public static void SetEmissiveColor(
    Color pColor,
    Material pMaterial,
    float pIntensity = 1f) {
  pMaterial.SetColor("_EmissionColor", pColor * pIntensity);
}
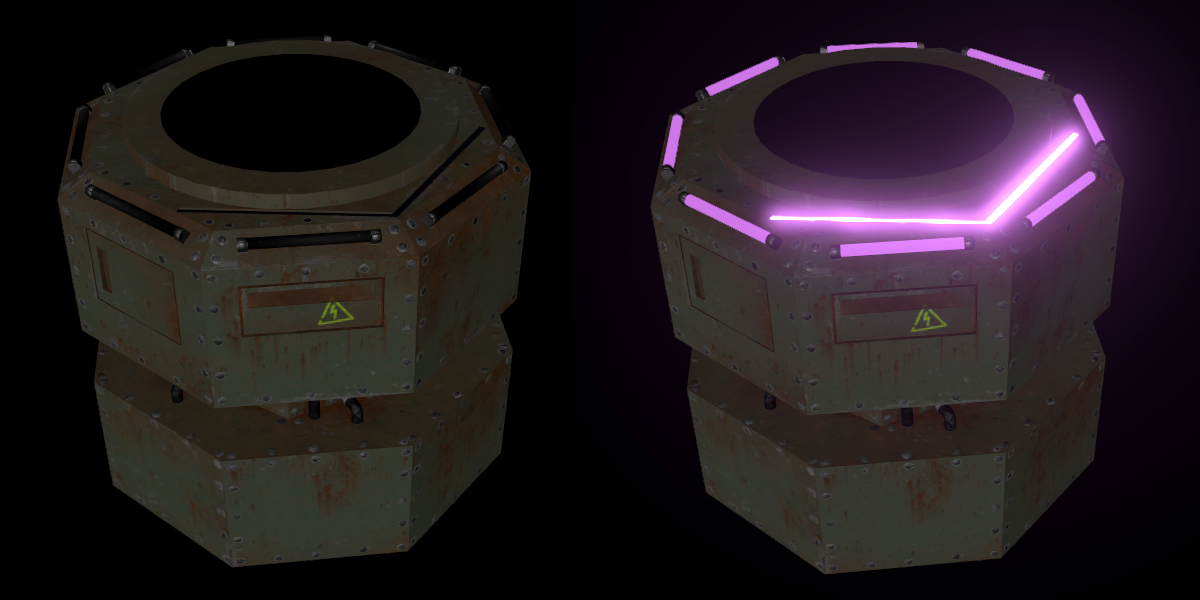
On the left is the module with "pIntensity" set to zero, on the right I applied purple color with little extra intensity and bloom (in post process). Notice how the arrow light is brighter because its emissive value is lighter.
Blinking and dimming
When modules get broken, the lights blink away i.e. switch between the dim and lit states. I found this to be much more perceptible than standard fadeout. Flickering is implemented by quantizing a one-dimensional perlin-function;
public static bool Flicker(float pRate, float pSpeed = 15f) {
  // value range [0, 1]
  float noise = Mathf.PerlinNoise(Time.time * pSpeed, 0f);

  // perlin produces less extreme values (near 0 or 1), so
  // spread out a little
  noise = Mathf.InverseLerp(.2f, .8f, noise);

  return pRate > 0f && pRate >= noise;
}
The animation below shows how the function works when "pRate" -values is slid from 1 (right) to 0 (left). Rectangle is visible on "true"-values.
Altering between states also means that there’s no need to worry about per-instance attributes in order to optimize Unity’s batching. Instead, only two kinds of material instances are needed: dim material that is shared by all broken modules, and four (max number of players) colored ones. As there are different materials for each three LOD-models, it makes the total colored variants count to 4 * 3 = 12.
When the game is loaded, the dimmed and colored material versions are instantiated from the base material we created before (you can duplicate material in Unity by passing the base material to its constructor). Then the materials' emissive values are overridden by the "SetEmissiveColor"-function shown above. Each ship is assigned with a unique color and we don’t need to adjust the emission parameters or worry about the material batching anymore; we just switch the material according to the module's condition and the flicker-function.
When a module is broken, the "pRate"-value is gradually reduced from 1 to 0 with random speed and duration. This is how it looks when multiple modules are broken at the same time.
Performance
As the new models are much more complicated than the previous placeholder-cubes, I have to start paying more attention to the performance. Vertex count shouldn’t be a major issue, since I’m focusing solely on PC-devices. But as there may be hundreds of modules visible at once, the complexity gets accumulated very quickly. Thus the low-poly models must be very simple.
I’m not quite sure how Unity's URP material batching works nowadays. So far I have mainly concentrated on reducing draw calls, but as far as I know, they shouldn't matter that much anymore. Stats-display shows pretty scary values but I haven't noticed remarkable FPS drops.
Actually, on my decent gaming hardware everything ran smoothly even with all the LOD models visible at once. Nonetheless, I'm having the game regularly tested with slower PCs also. Any up-to-date hints about the URP-optimization are highly appreciated.
Thoughts of the process so far
Now that we have our first model fully textured and functional, it is a time for a little recap.
While writing these articles, I re-visited the models and noticed how much my workflow had improved since the beginning. Therefore I decided to leave out some of my since-abandoned ways of working. In other words, I have been a bit dishonest: the things didn't go as fluently as my explanations may suggest.
Two things in particular need to be improved in my workflow:
- Common keyboard shortcuts. All programs have slightly different control schemes, which makes things awkward when constantly switching from one program to another. Customizing controls is difficult since you easily override other controls. It is also hard to follow instructions when using other than the default key bindings. But I may have to do it anyway in the future.
- More automated pipeline when transferring data from one application to another. Lots of manual work is required in preparing, transforming, naming , saving, loading etc. Some kind of scripted solution would make things much faster and less error prone. There are a couple of things I should familiarize myself with. For instance, Substance is able to load different model types from the same FBX if models are named with proper suffixes (see here). Also, Adobe has released an add-on for Blender that should streamline the workflow with meshes and materials. And of course there are the export (Blender) and import (Unity) dialogs I mentioned earlier. All probably worth learning.
From this on, I'll be covering (about) one model per post. Some of the stuff will be just applying the lessons learned so far, but there will be lots of new challenges also.
As always, thank you for reading. Feedback is welcome.
Leave a comment
Log in with itch.io to leave a comment.