
Avaruustaistelupeli
Making graphics for ATP #7: Moving parts
All right, back again. This time we split models in parts, that we then move/rotate independently.
Writing this chapter took so long that Blender is already updated to version three. There might be inconsistencies, but I try to stick to a very basic level so things should be easily interchangeable between the versions. But anyway, consider this post to be more of a diary than a tutorial.
Requirements
So far all the module types have been modeled as monolithic objects that remain fixed relative to the module base; no rotations or otherwise moving parts. Some modules, however, must break this limitation. Common example is a cannon that points towards the crosshair.
Each module in this post is split into multiple models and imported to Unity as separate meshes. All modules have at least two parts, the static base and a tower, and some have additional parts for special functions. Everything in ATP is hard-surfaced, meaning that there’s no need for skinning or rigging. Towers rotate only around the top-down (camera-forward) axis. Rotation is mostly determined by thrust direction or crosshair position. Broken modules don’t rotate at all
There are a total of nine rotating module types, where some are just variations of others.
Thrusters are divided into two categories: static and rotating ones. Static thrusters are sturdier than rotating ones but their orientation is fixed. Rotating thrusters rotate freely, but cannot produce as much power. Technically speaking both thrusters types rotate, the only difference is in the way the game handles them: rotating thrusters are always oriented according to the player's input, while static thrusters’ orientation is determined at the start. Below are images of the rotating and static thrusters.
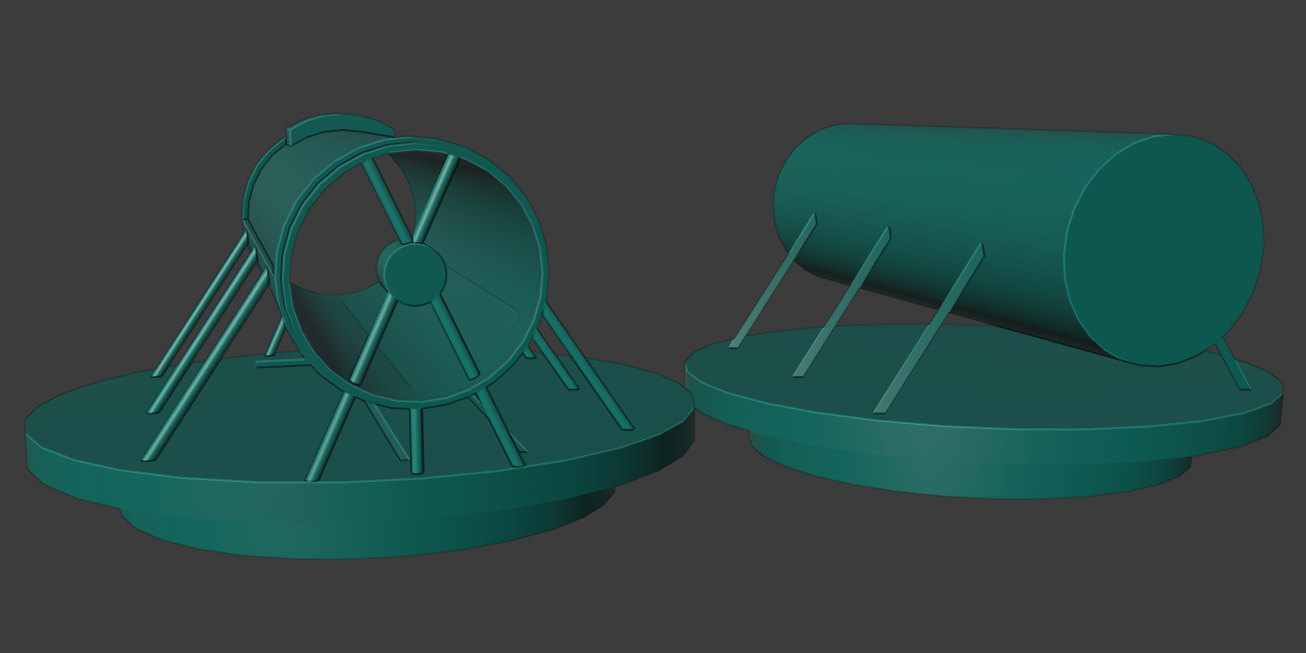
Beam shooters share similar technology with each other. Pressor beam shoots its energy beam forwards. Ray travels through the wire from the module to the compression cylinder; three cones further amplify it, before releasing it to the target. Tractor beam is a modification of the previous one: cones are reversed, wire is cut and the compressor is smashed to make sure the ray travels contrariwise.
Cutter is a modified industrial laser. It is easily broken and prone to cannon hits, but its ray is dangerous from close distance. As they are not originally meant for fighting, clumsy wires are needed and the muzzle must be precisely aimed from the stand.

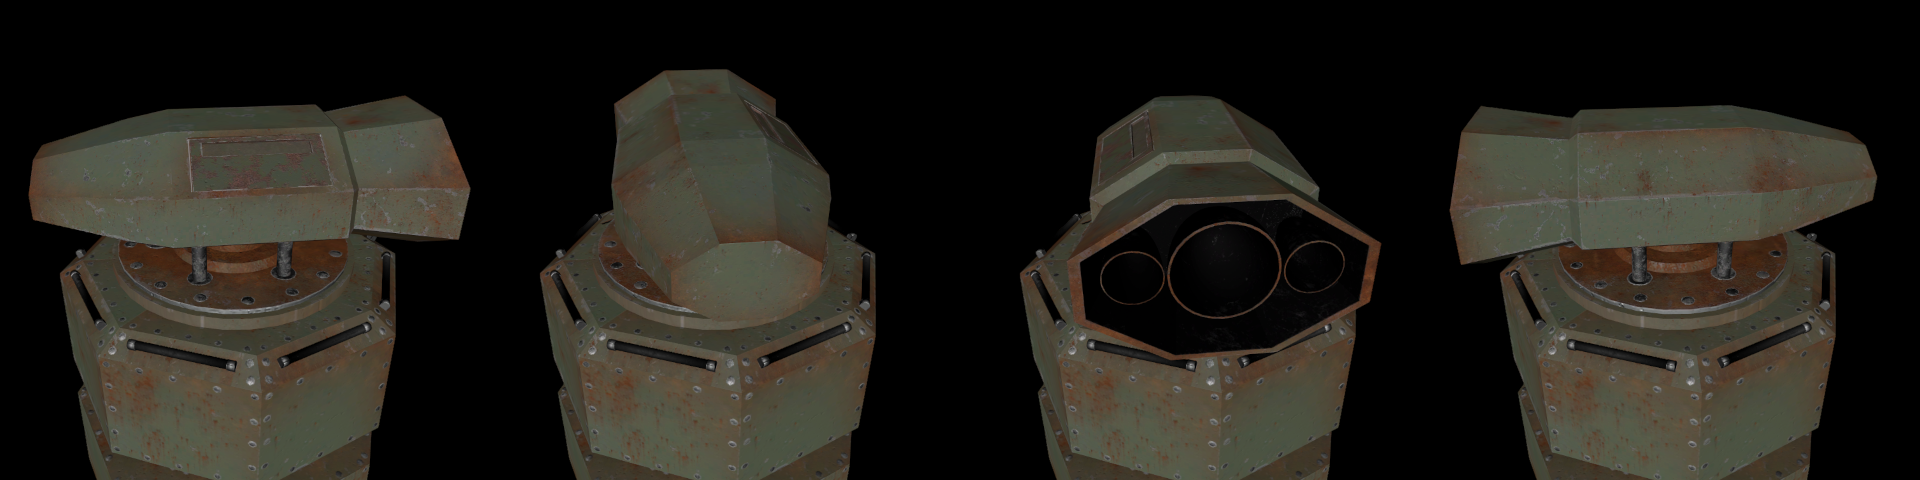
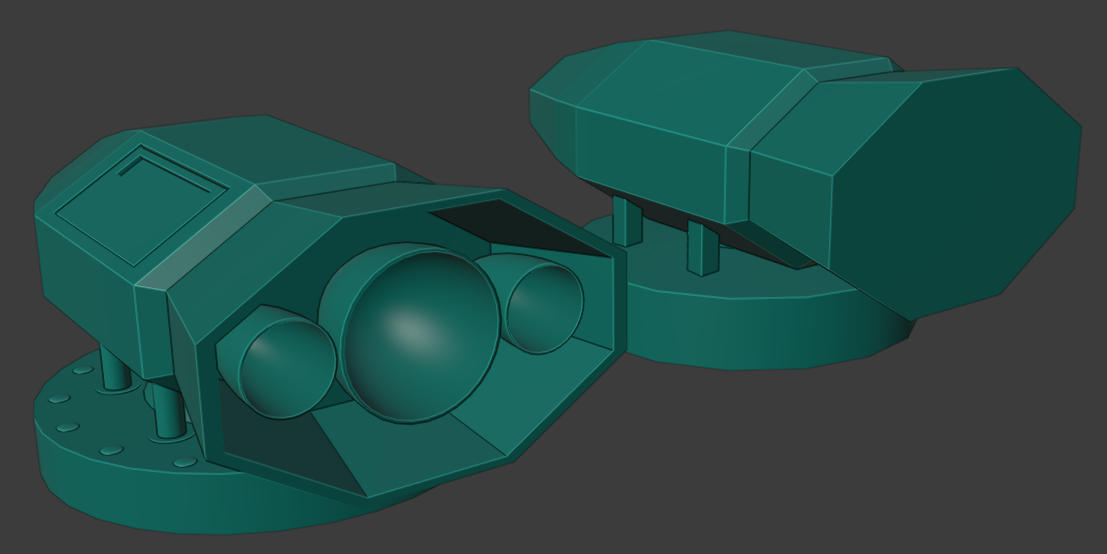
Cannons are the main weapon of the game. In addition to the rotating tower, they also have a moving muzzle to sustain the totally realistic, physically accurate recoil that is absolutely essential to the gameplay.
There are two kinds of missiles: normal missiles and homing missiles. Launcher’s pipe must fit one missile at a time, and the whole arsenal (8 in the current game version) must fit inside the module's base. A Homing missile launcher also needs an independently rotating radar to guide the projectile.
Shields form a force field that stops projectiles and reflects cannon shoots. Force field is emitted by the rotating shield wings, which can produce a half-sphere on their side. As the force field must encapsulate the whole module, half-spheric fields must be generated from top and bottom.
Modeling in Blender
Static parts have nothing special to the parts handled in the previous chapters. Also, since modules are mostly shown from above, they seldom have anything interesting on their bottom side; a plain face to cover the bottom is usually enough. There are two special cases however: missile launchers need extended storage space, and shields have a rotating bottom similar to their top-side. These will be discussed later.
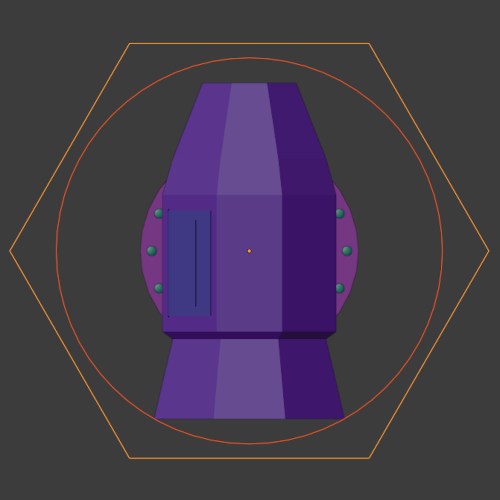
Modules are positioned on a hex grid, and rotating parts must fit inside the module's hex on every orientation. Mathematically speaking, distance from the geometry's center to its farthest point (the circle in the image below) must be less than the hex's small radius. (Sidenote: it took me a whole one module to forget this rule. Only in Unity I noticed that static thrusters didn’t fit, and I had to scale them down.)
All parts have uniform transform and they are centered at the origo. This way they can be imported to Unity and rotated around their z-axis without further transforms. (Another sidenote: in the process I noticed that my modules were about half cm off center. This isn’t a visible error, but may cause some confusion in modeling. So not that trivial, after all.)
I didn’t want to create new Unity-material for each part, so I mapped everything to the same UV-space in order to make them share the same texture. You can unwrap multiple objects to one UV-space by selecting all objects, switching to edit-mode, selecting all faces and unwrapping.
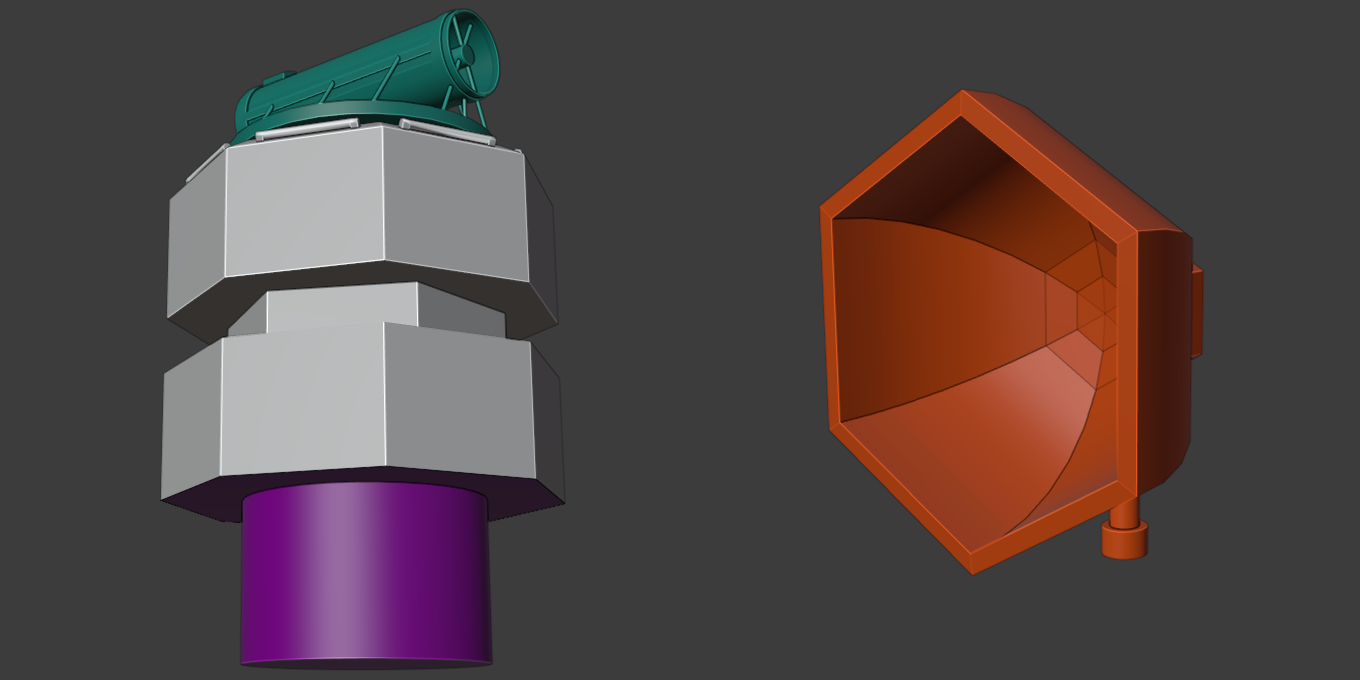
Three FBX-files are exported. Unity will receive a file where separately moving parts are detached from each other; this way each of them can be transformed independently (on the left below, objects are pulled apart to make them clear). Substance needs two models. The first one has only one material (center). The second one is used for ID baking, so each different material is assigned (on the right).

Two levels of detail are exported from each module.
Thrusters represent the basic type of rotating modules with their two parts: static chassis and rotating tower. Cylinders are my thing, so thrusters are made almost entirely of them by varying dimensions and resolutions, adding edge-loops and scaling here and there. Hatches are done by insetting and extruding the face. Static thruster’s hatch is on the non-axis-aligned face, so it is the more complicated of the two (see chapter 2 for detailed explanation on how to deal with them). Thruster cones are stretched half-spheres fattened with a Solidify-modifier.
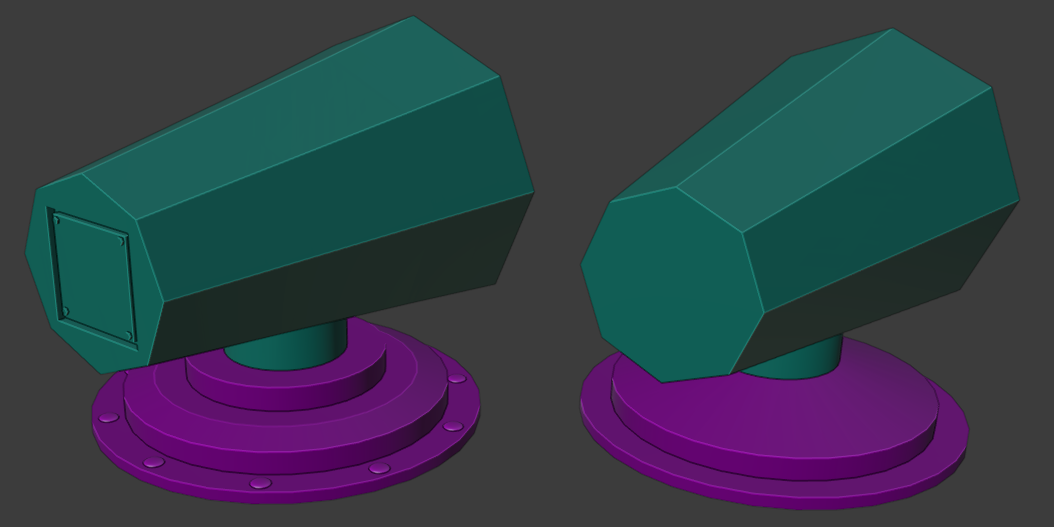
Below are all the variations of the thrusters. Rotating parts are colored cyan, and static purple. On the top are the high- (left) and low- (right) poly versions of the rotating thruster. Bottom image shows static thrusters; they only have rotating parts, which are not animated during the gameplay.
Pressor and tractor beams are variations of the same base, pressor beam acting as a starting point. Cones are actually cylinders with front ends scaled down, back faces removed and the whole thing fattened with a Solidify-modifier.
Stand joints are made with "Add Mesh Extra Objects"-collection's "Pipe Joints"-addon, the wire with Blender’s standard curve tool. Since I used Blender 2.91, I won’t be giving further explanations as they can be obsolete in version 3. For more complex wirings there are also more advanced plugins that make modeler's lives easier.

For the tractor beam, I cut the wire by simply moving the curve’s other end, and cutting a hole to the stand with the Boolean-modifier. Cylinder's damage is done by randomly pushing and pulling vertices, and finalizing the job with sculpting.
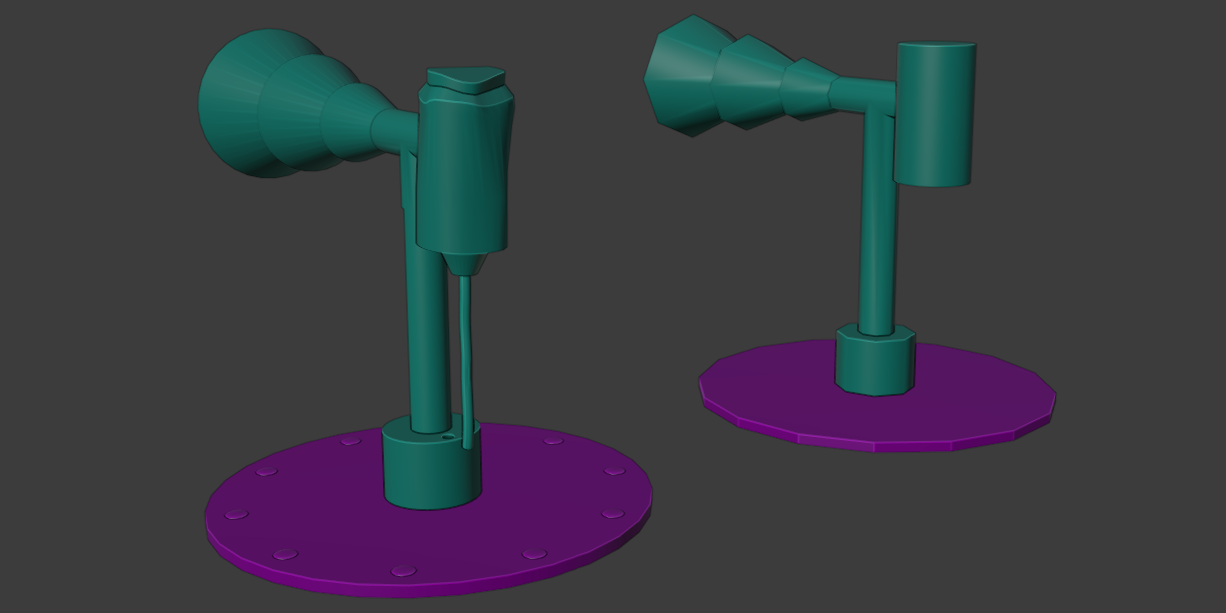
There are some glitches in the normals of cones and pipe joints, but I challenge anyone to notice them from the game. So close enough for now. Probably beam shooters would also need some kind of tilting joint, as they are too high.
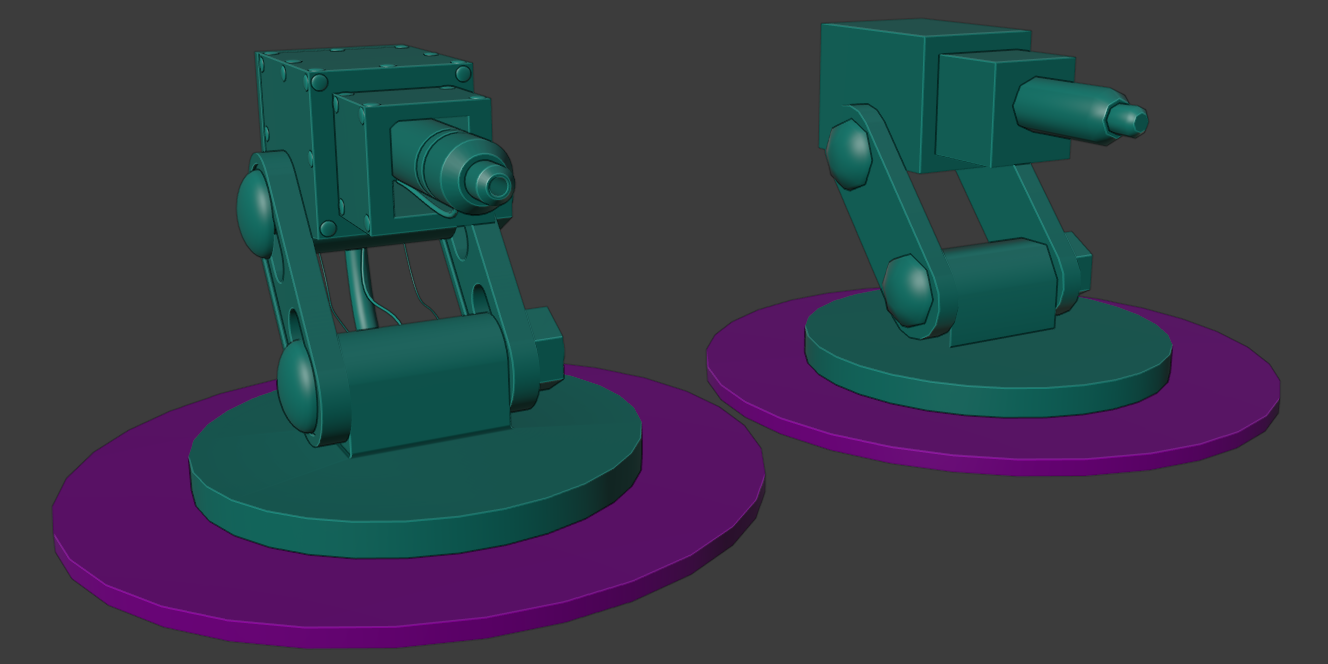
Cutter was the last module I modeled, so I tried something more complicated than before: a detailed stand with varying types of pipes and wires.
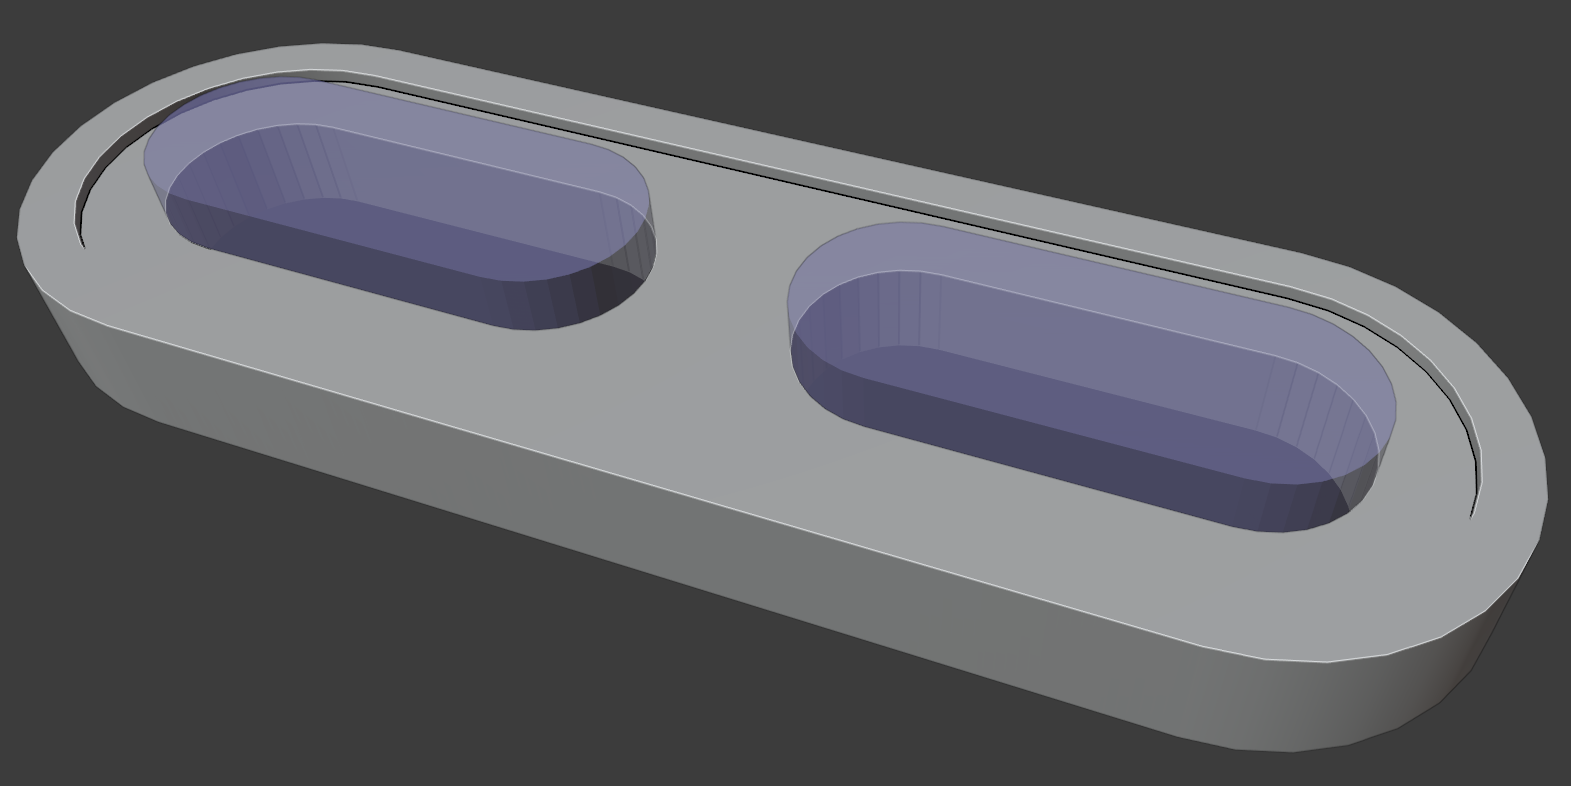
Legs of the stand are stretched circles that were fattened by extrusion and then inset for the hollow part. Holes are made with the Boolean-modifier by subtracting the blue objects from the leg. All worked surprisingly well causing no artifacts.
Because of the adjustable stand, wires need to be loose. They are modeled with curves similarly to beam shooters, but by using different thicknesses (Object Data Properties -> Bevel -> Depth).
I beveled the hi-poly model’s sharpest corners to improve the quality of baking in Substance. Normals aren’t quite there but, again, I’m sure no one notices. Because of the detailed hi-poly model, the lo-poly version was hard to do. I dissolved all possible edges (Edge -> Dissolve edges) and created completely new cubes for the top part. Wires are excluded from the low-poly version.
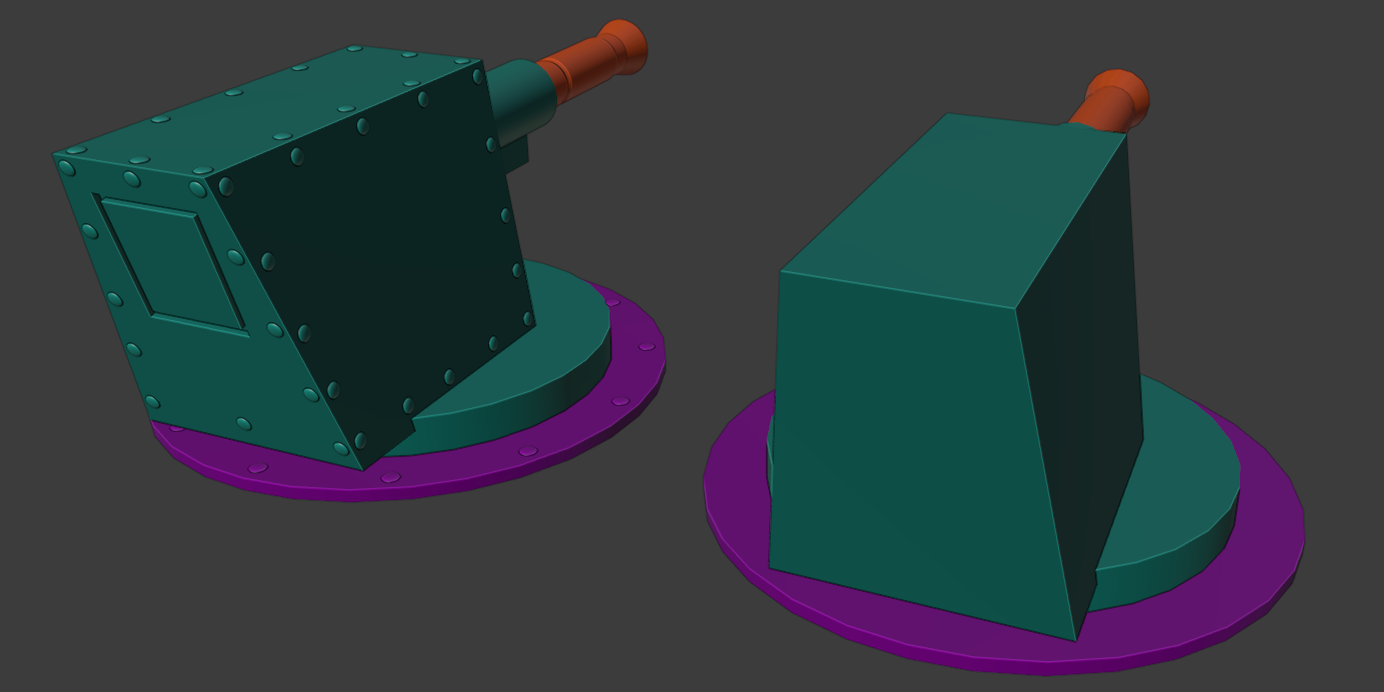
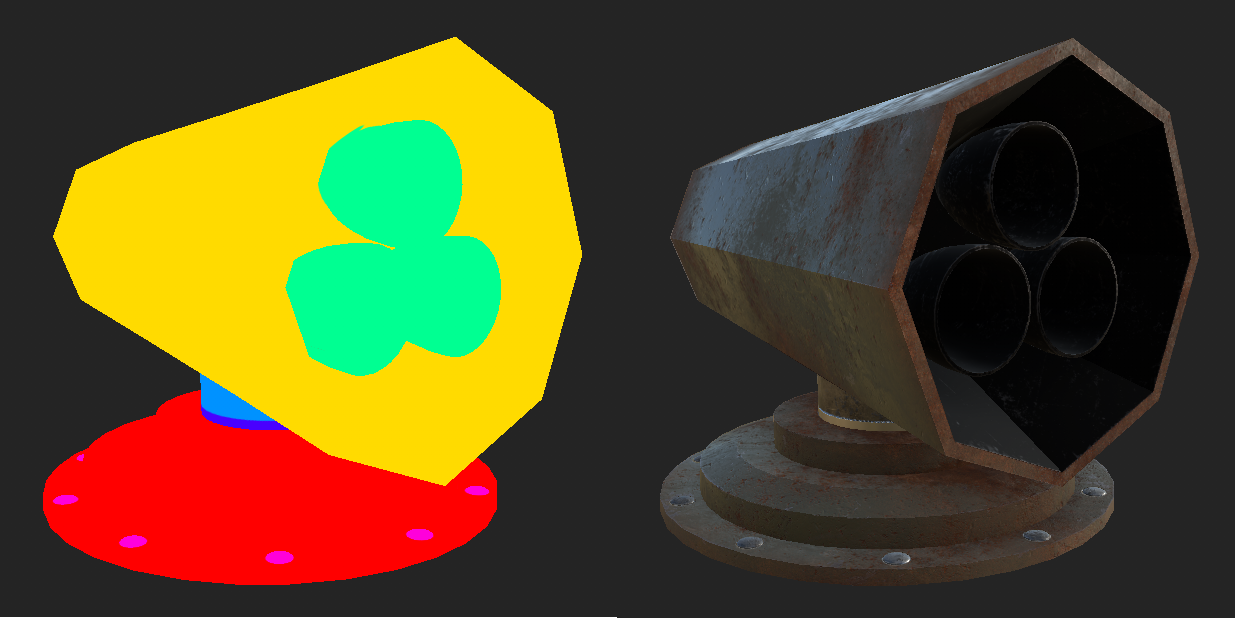
Cannon has some sloping surfaces that make good variance to the style without breaking it. Hatch at the back is done similarly to static thruster's hatch. Snapping objects (bolts in my case) to match the orientation of non-axis aligned faces has been mostly trial and error for me. This time everything went properly at the first try, but there must be something I’m still missing. Three parts needed to be exported instead of two: static (purple), rotating (cyan) and muzzle for recoil (orange).
Modeling the missile launchers wasn’t my finest hour. Two edges ended up crossing each other and messed up the UV-mapping; probably due to a mistake with the extrusion (remember that pressing esc doesn’t revert the extrude). I also forgot to reset the transforms before texture mapping, so UV-islands' proportions were wrong. Don’t be like me, but always remember to ctrl+A + “all transforms”. Luckily mistakes were easy to fix once found.
Missile's size in the current game version works well so I took it as a reference. The pipe, hollow cylinder thickened with a solidify-modifier, fits the missile precisely. Both pipe and floor have a (non-animated) hatch, where the missile is supposed to be raised to pipe for a launch. At the rear of the pipe is a round part that triggers the missile.
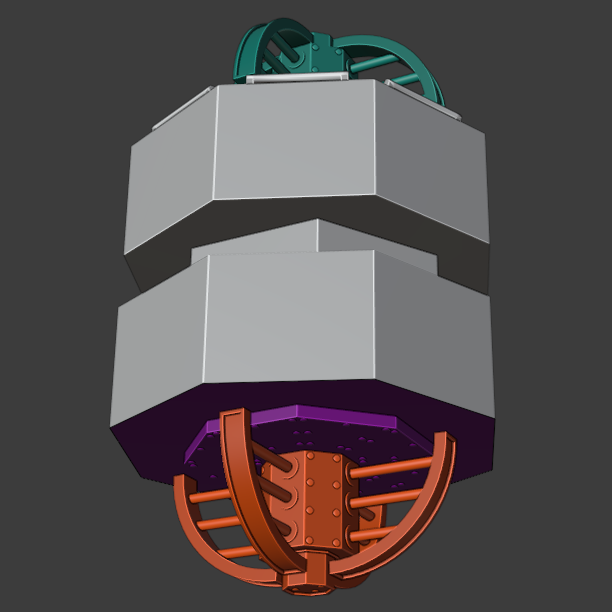
Each missile launcher carries eight missiles, and it was pretty hard to fit so many of them inside the module. The best solution I figured out was to put them in a standing position, and extend the module's bottom (on the left below). Homing missile launchers have a rotating, target-seeking radar on top of their pipes (on the right, not in a scale). It is exported as a separate object with its own origo in order to rotate it independently from the pipe.
Also shields have three parts: bottom, top and static center. Top and bottom are identical, only mirrored vertically. Bottom’s uv-islands are scaled remarkably smaller than the top, as they are practically never visible during the gameplay. Once again, I had problems with the bolts since I hadn’t reset the transforms. I’m too embarrassed to tell you more, so forget it.
There are a number of ways to model arcs. I used, you guessed it, cylinders as a base, squeezed it slender enough, removed three fourths of its section, and solidified.

Texturing in Substance
As mentioned before, I want all the detached parts to share the same texture and material. As Substance exports each material into its own texture, I had to create a FBX-file with all geometry combined under one material. Multi-material models are used to bake meta-textures.
Below is an image of a rotating thruster with baked ID map (left) and final materials (right). Stylistically I used materials similar to the ones handled in the previous posts. Not because it’s easy, but because it makes things look cohesive. Honestly. Only consideration is the scraping areas between static and dynamic parts. Those shouldn't rust, and should be represented as shining and unpainted. I gave them their own materials in Blender (dark blue in the image below), so the material assignment was easy.
There are some old videos, where static thrusters are painted black. While fixing their scale, I also decided to change the surface to better match other modules.
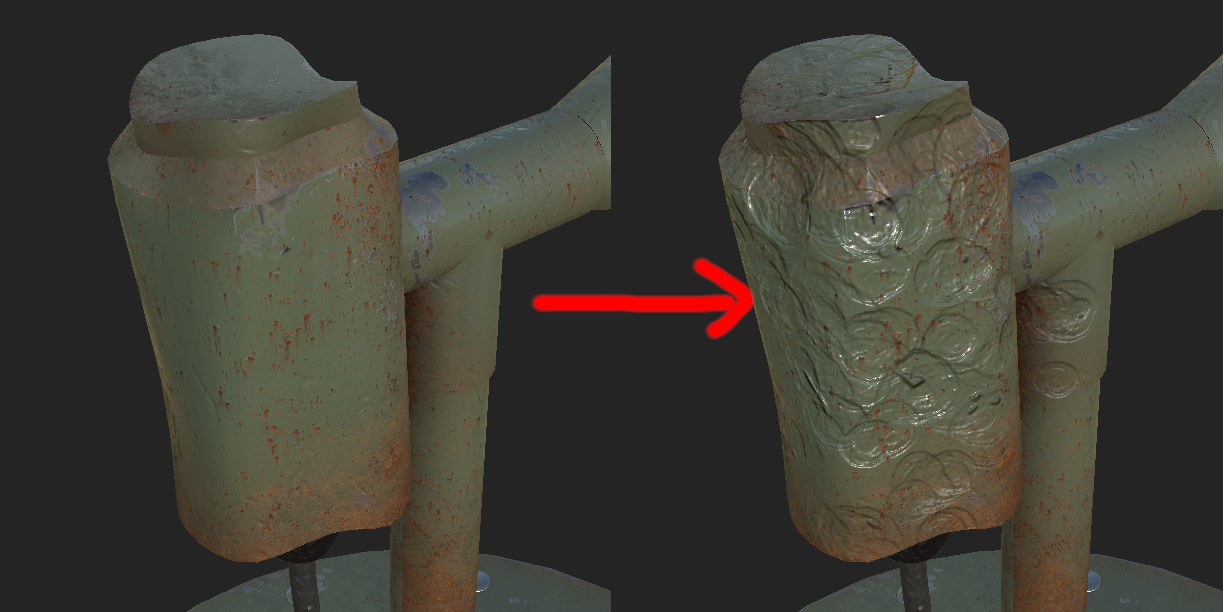
Tractor beams were created by brutalizing the pressor beam launchers. I boosted the sculpted damage by painting hits and bumps to the height map. This is achieved by creating a layer that modifies only height values, and then using alpha brush to smash hits all over it. On the left is the model without the bump layer, on the right is the version with all the decorations.
I'm not sure if the long and complex modeling has anything to do with this, but baking the cutter went unprecedentedly well. Even the warning sign in the back got textured properly to a low-poly model (on the right below) by just copy-pasting the layers. No news is good news here.

With cannons I made a mistake by reserving UV-space for only one bolt. Thus all bolts are now textured identically, but if you forget what I just mentioned, you'll never notice anything (this is starting to be a theme). And somehow I like the roughness of the low-poly model even better than the crisp hi-poly texturing.
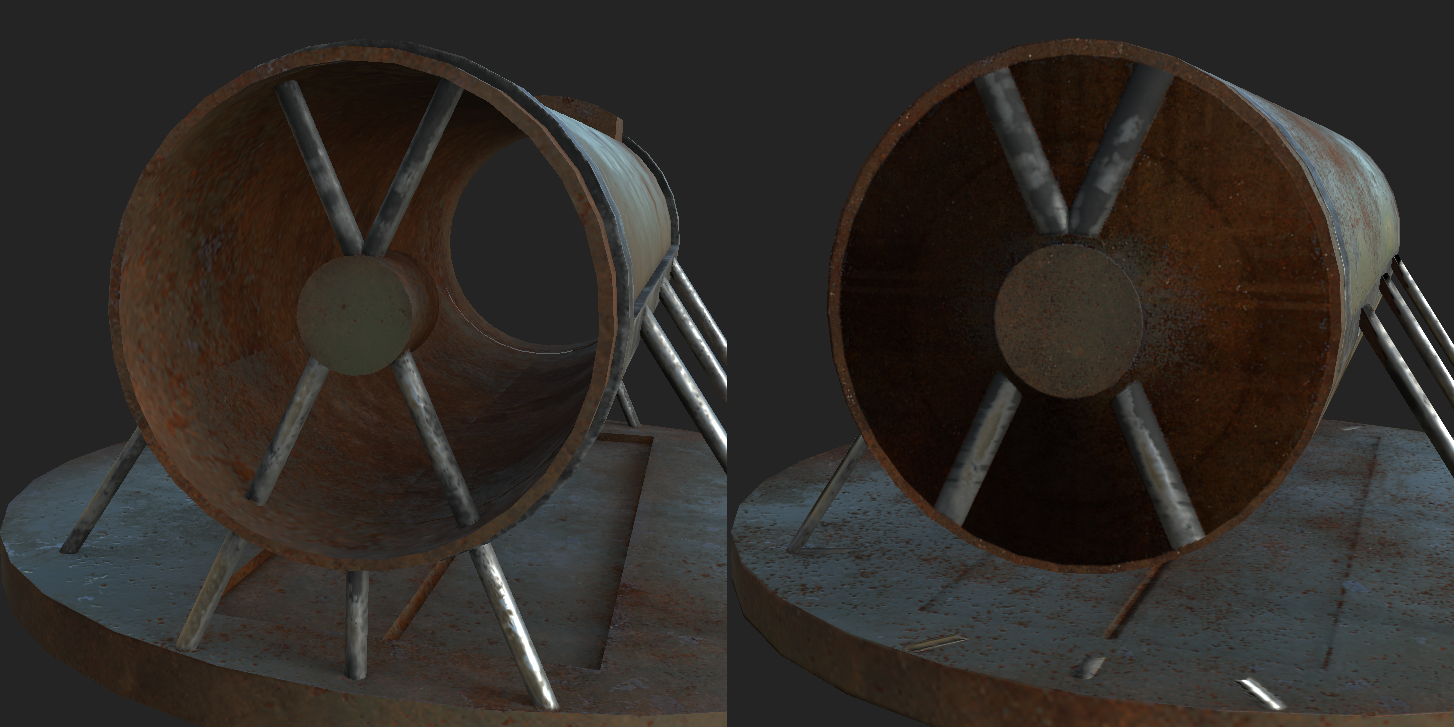
I don’t know if there are any best practices for baking low-poly versions of hollow objects, but no matter what, you won't be able to see through the low-poly pipe of missile launchers. As the low-poly model is only shown from above, this shouldn’t matter much. I just have to make sure, the hi-poly version is exclusively used in closeups. On the left is the hi-poly model with a real pipe, on the right is the solid low-poly version.
Putting emissive parts to the shield arcs would look very scifi, but as tempting as it is to go into that direction, I won't. Not only would they break the style, but they would probably also mess up the player coloring. So shining pitch black it will be.
Making it work in Unity
When models are imported to Unity, they often have non-uniform scales and rotations depending on coordinate system and used units. I have found it easier not to rotate or move those objects directly, but to parent them to objects with identity-transform, and manipulate them instead. Neither do I parent other objects (such as muzzle flashes) under non-uniform objects; scaling affects all the descendants, which may result in weird glitches. So create a uniform game object and update its transform instead.
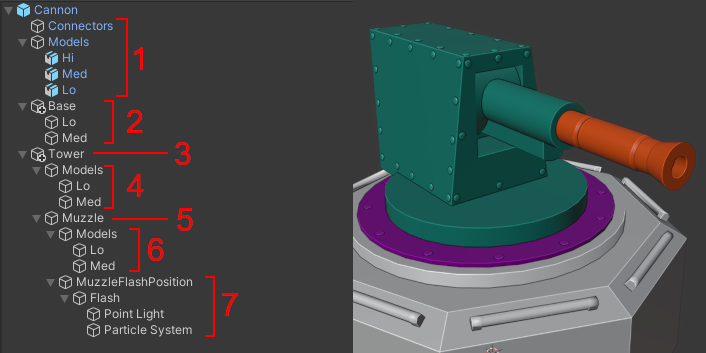
Image below shows the object hierarchy of the cannon, which is probably the most complex one in the game. Parts 1 - 4 are found from every module handled in this post, 5 - 7 are specific for the cannon. Other module types may have their own specialities.
- Common parts for all modules (shown gray on the right side). Inherited from the ModuleBase -prefab (erroneously called "BaseModule" in earlier posts).
- Models of the static parts (shown purple). Every module type has these (also the ones handled in the previous posts). For historical reasons, the hi-poly version is called "Med".
- Object where the rotations are targeted. This object must have a uniform transform.
- Models of the rotating parts (shown cyan).
- Object where the muzzle animations are targeted. This must have uniform scale and rotation.
- Muzzle models (shown orange).
- Muzzle flash effect.
When it comes to cannon's LOD-transitions, one disappearing bolt is irritatingly visible when switching between LOD levels. But as said before, I like the low-poly model more, so the high-poly model won't be seen during gameplay. From the positive side, I got the recoil animation right on the first try, so at least something is done right. Plenty of joy about a detail nobody will ever notice in a game, so watch carefully now:
As most towers work with similar logic, I wrote an Aim-component that automatically rotates the tower according to the crosshair (unless the module is broken).
Modules utilize Unity’s nested prefabs, and thrusters are perhaps the most complex example. Thrusters’ prefab hierarchy is shown below. Every module inherits the ModuleBase. ThrusterBase encapsulates common functionality to all thrusters: physics, thrust effects etc. ThrusterRotating and ThrusterStatic contain proper models and power multipliers. Static thrusters by direction are simply rotated to correct orientation (not animated during the gameplay).
ModuleBase
  ThrusterBase
    ThrusterRotating
    ThrusterStatic
      ThrusterBackwards
      ThrusterForward
      ThrusterLeft
      ThrusterRight
I’m pretty satisfied with this layout. There is minimal duplication between the objects, and small adjustments to balancing and audiovisuals can be done in one place, then applied everywhere.
As with the thrusters, the pressor and tractor beam share most of their properties, and are therefore inherited from the common BeamShooter-prefab. Only models and associated materials need to be specialized, and a single script is able to handle both beam types by simple parameterization. The placeholder models used in previous game versions didn’t have a muzzle, so I had made a small mistake: instead of rotating the tower, I rotated the beam instead. A mishap that often happens when working with placeholders, but luckily an easy one to fix.
Cutter’s LOD transition is exceptionally indistinguishable. If I see no transition, it is usually because the LODs don’t work, but this time they did. Seems that the harder the object is to model, the better its transition works. I should probably improve my modeling skills instead of just fixing things in Substance...
Apart from the radar, the missile launcher and homing missile launcher are identical. Therefore I just reused the homing missile launcher and disabled radar from the common missile launcher. The missile itself is composed of Unity’s primitive meshes, so neither Blender nor Substance was needed here. Material is a shiny metal, as missiles don’t obviously get to wear much.

Whereas missile launchers’ LOD transitions aren’t very fluid, shields work much better. Again, the more complex the model, the easier the transition. I accidentally included bolts' geometry to the hi-poly model instead of baking them to texture, so the overall geometry is much more complicated than it should be. No effect in the big picture, however, since only the low-poly model will be visible in the gameplay; hi-poly-version is reserved for closeups. Shield’s rotation works differently from others: it isn’t aimed, but top and bottom rotate in opposite directions when the shield is on.
Aftermath
About performance and topology details
Performance can be very subjective. On many occasions I thought the game was getting heavier, and I may have to concentrate on optimizing things. To be sure, I built development versions to be tested on old devices. Time after time, testing showed no remarkable performance drops, so it seems that I've paid too much attention to reducing polygon count.
Similarly, I’m aware of several topology issues here and there, but when I revisited the models after a couple of months, I hardly noticed the issues anymore. I may regret this later, but now it seems that I have used too much time dealing with them also.
Lessons learned: don't aim for perfection.
For my one year younger self
- Save your progress! Blender (2.83, at least) crashes often, especially during UV-unwrapping. Also remember to utilize Blender’s file versioning (that plus-button next to filename input field) in order to revert into previous versions.
- It is deceptively easy to miss errors in meshes (especially duplicate vertices and crossing faces). Carefully check everything before exporting FBX-files. "3D print toolbox"-addon helps somewhat, but I never remember to use it.
- Modules share lots of similarities, so it would be productive to build lots of predefined pipes, joints, bolts, cables and other components to be used as building blocks. Blender 3 actually has assets for this (haven’t used them yet).
- Using Blender's vanilla functionality, and learning things at a low level before relying on addons is beneficial. But also learn to utilize add-ons. They save so much time.
- Use more reference images. Many times I felt pretty lost during the modeling process. With good references, things get much easier.
- Reserve dozens of gigabytes of hard drive space especially for Substance-projects.
- Unity automatically adds a mesh collider for each imported model. Since Avaruustaistelupeli uses 2D-physics, those serve no purpose, but may affect FPS by accident. Remember to remove them.
Next
There’s one more chapter about the modules to be written. Theme will be “all the rest”, so it’s going to be about the miscellaneous stuff that is still uncovered. Hopefully that post won't take as long as this did. Once it is done, I might also write about making the logo and the arena.
Nowadays I’m also keeping a weeklyish dev-diary in TigSource. Visit there if you're interested in more up to date news.
Thank you for reading. Stay safe, and don’t forget party gaming.
Leave a comment
Log in with itch.io to leave a comment.